 how-to
How to Dry Out Attic Insulation After a Leak
Table of Contents
- Stop the Leak and Assess the Damage
- Does Insulation Dry After Getting Wet?
- How Long Does Attic Insulation Take to Dry?
- Wet Insulation Removal: When to Tear It Out
- Drying the Attic Space with Air Movers and Dehumidifiers
- Verifying Dry-Out and Preventing Attic Moisture Problems
- Frequently Asked Questions
Last Updated: October 15, 2026
Stop the Leak and Assess the Damage
Learning how to dry out attic insulation after a leak starts with one rule: stop the water before you dry anything. Every hour the leak runs, more insulation gets soaked and more of your ceiling, wiring, and roof framing sits in water. At Sound Roof Care, we've spent over two decades repairing roofs in this wet climate, and the pattern is always the same.
Here's your first move: get a bucket under the drip, then find where the water is actually coming from.
Find the Leak Source
Water rarely drips straight down from the hole. It runs along rafters and sheathing first, so the wet spot on your ceiling is often several feet from the real entry point.
- Check the roof above the drip, not just the drip itself
- Look for stained sheathing, dark streaks, or soft spots on the roof deck
- Inspect around vents, chimneys, skylights, and flashing
- Test with a garden hose on a dry day if the source isn't obvious
If you can't trace it safely, call a roofer. Climbing a wet roof is how people get hurt.
Check for Ceiling, Wiring, and HVAC Damage
The leak doesn't just hit insulation. Water travels.
Look for sagging drywall, bubbling paint, or brown rings on the ceiling below. Those mean the drywall is holding water. Check any wiring running through the attic for dampness, and never touch wet electrical components. If your HVAC ducts or equipment sit in the attic, inspect them too. Wet ducts can grow mold inside the lining.
When in doubt, shut off power to affected circuits and call a professional.
Does Insulation Dry After Getting Wet?
Some insulation dries. Some never recovers. The decision isn't just about the material, it's about how wet it got, what was in the water, and whether the material can hold its structure after drying. This is the decision framework most guides skip.
Material-by-Material Drying and Replacement Guide
| Insulation Type | Water Retention | Drying Potential | Replacement Criteria |
|---|---|---|---|
| Fiberglass batts | Low | High | Replace if matted, compressed, or contaminated with dirt or roof grit |
| Loose-fill fiberglass | Low to moderate | Moderate | Replace if clumped or if it has settled unevenly after drying |
| Cellulose | High | Low | Remove and replace once saturated; it loses loft and R-value permanently |
| Closed-cell spray foam | Very low | High | Wipe down and dry the surface; replace only if the foam is damaged or delaminated |
| Open-cell spray foam | Moderate to high | Low to moderate | Inspect for trapped moisture; partial removal is common |
| Foam board | Low | High | Dry the surface and check seams; replace if the facing is waterlogged or moldy |
| Mineral wool | Low | High | Usually dries in place; replace if it stays damp or shows mold |
The Contamination Question
Not all leak water is the same. A clean roof leak from rain is different from water that has run through dirty sheathing, insulation debris, or a contaminated attic floor. If the water picked up organic matter, roof grit, or animal waste, the insulation is contaminated even if it dries. Contaminated insulation should come out, drying won't remove the residue that feeds mold.
How to Decide in the Field
- Check the material type. Cellulose and open-cell foam are the least forgiving.
- Check the moisture level. Use a moisture meter on the insulation and the framing beneath it. If readings are high after 48 hours of drying, remove it.
- Check for contamination. Any musty smell, visible mold, or dark staining means replace.
- Check the structure. If the insulation was holding water against wood framing, the framing needs to dry before new insulation goes in.
Fiberglass batts and rolls are the easiest to save. Cellulose almost always comes out. When in doubt, remove it, the cost of new insulation is far less than the cost of rot and mold remediation.
How Long Does Attic Insulation Take to Dry?
Lightly damp fiberglass can dry in 24 to 48 hours with good airflow. Saturated cellulose or open-cell foam may never dry fully and should come out.
Speed depends on three things: how wet it got, how much air moves through the attic, and how humid the air is. In a damp climate, that last factor matters most. Pulling humid outside air into a wet attic slows everything down.
A few things that slow drying:
- No ventilation or blocked soffit vents
- Piled or compressed insulation
- Cool, rainy weather with high humidity
- No dehumidifier running
If the insulation is still damp after two days of active drying, it's time to remove it.
Wet Insulation Removal: When to Tear It Out
Pull the insulation if it's cellulose, if it's matted or clumped, if it smells musty, or if it shows any mold. Those are the cases where drying won't bring it back.
Fiberglass that's only lightly damp and still fluffy can stay. Everything else goes.
Removing wet insulation isn't just about R-value. Saturated insulation holds moisture against wood framing, and that's how rot and mold start. Getting it out fast protects the structure underneath.
How to Remove Saturated Insulation Safely
- Put on an N95 respirator, gloves, and eye protection
- Lay plastic sheeting on the attic floor and ceiling below
- Bag the wet insulation in heavy-duty trash bags
- Use a shop vacuum for small bits and debris
- Check the roof deck for stains or soft spots before reinsulating
- Let the space dry completely before adding new insulation
Drying the Attic Space with Air Movers and Dehumidifiers
Once the wet insulation is out, dry the attic itself. Air movers and a dehumidifier do the heavy lifting, but how you set them up and how you verify the results is what separates a two-day dry-out from a two-week mold problem.
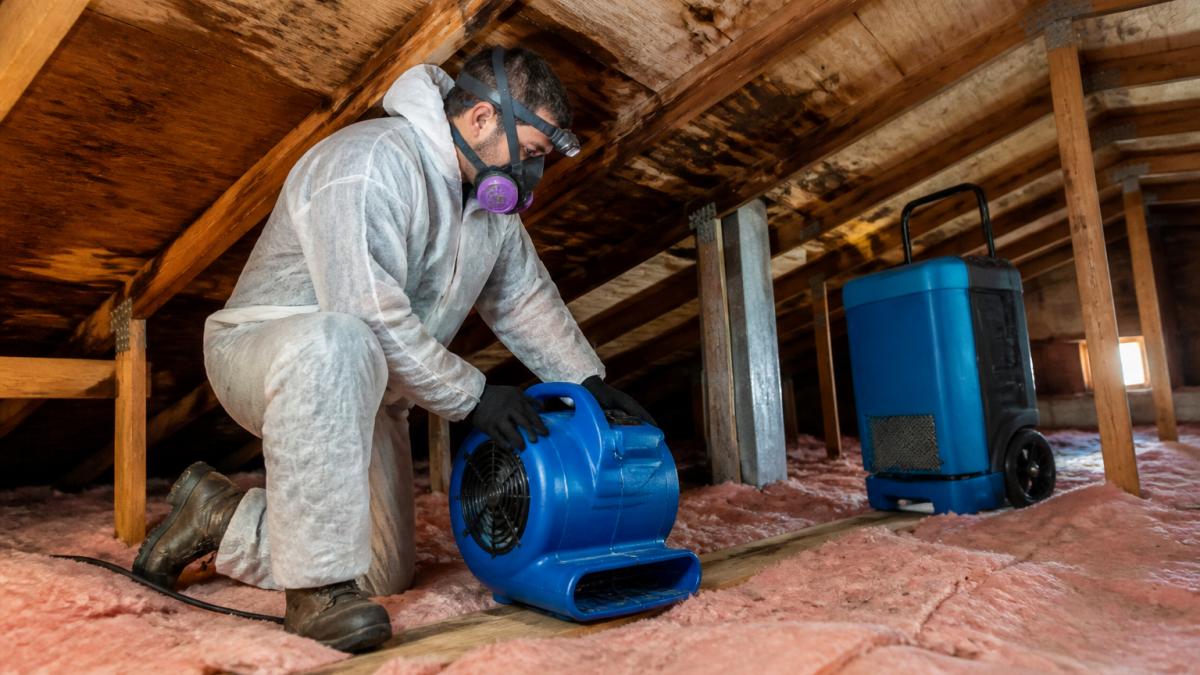
Equipment Setup That Actually Works
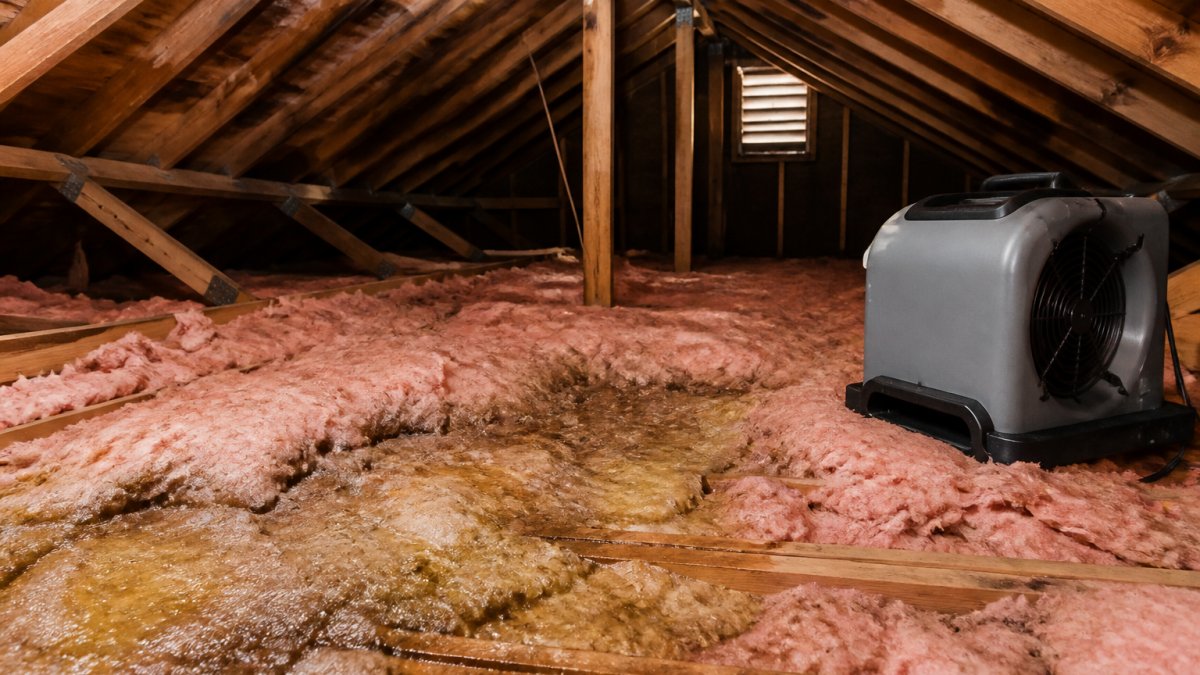
Set air movers to push air across the wet surfaces, not just into the room. Angle them along the roof deck and joists so moisture lifts off the wood. Run a dehumidifier at the same time to pull that moisture out of the air. Without one, you're just moving damp air around.
A few setup tips:
- Point fans along the deck, not straight up
- Keep the dehumidifier draining continuously if you can
- Open soffit and ridge vents so moist air escapes
- Run the setup for at least 24 to 48 hours, then check
For a soaked attic, a pro with drying equipment gets it done faster and checks the moisture levels properly.
Measuring Moisture, Not Guessing
You can't feel whether framing is dry. A pin-type or pinless moisture meter gives you a number. Take baseline readings on dry wood in an unaffected part of the attic first, then compare:
- Roof deck and sheathing: readings should return to within a few percentage points of the dry baseline
- Ceiling joists and rafters: check the ends where they meet the walls, since moisture wicks into those joints
- Top plates and wall framing below the leak: water travels down, so the damage often extends past the attic floor
A common pattern is that the surface reads dry while the core of a joist stays elevated for days. If readings are still high after 48 hours of active drying, keep the equipment running and recheck daily.
When to Bring In a Pro
If the attic has standing water, saturated cellulose, or a musty smell that won't clear, a professional drying setup with commercial-grade dehumidifiers and air scrubbers will finish the job faster and document the dry-out for insurance. Most restoration contractors use moisture mapping and daily readings to confirm the space is dry before any new insulation goes in.
Verifying Dry-Out and Preventing Attic Moisture Problems
You're not done when the surface feels dry. Wood and insulation hold moisture you can't feel with your hand.
Use a moisture meter on the roof deck, joists, and any wood that got wet. Readings should match dry wood in an unaffected part of the attic. If they're higher, keep drying.
Then fix the cause. A repaired leak plus better ventilation keeps attic moisture problems from coming back. Add air sealing around gaps and penetrations, and make sure soffit and ridge vents aren't blocked by insulation.
Finally, watch for mold regrowth over the next few weeks. Musty smells, dark spots, or new staining mean moisture is still getting in. That's when it's worth calling in a pro for mold cleanup guidance from the CDC and a full roof inspection.
At Sound Roof Care, we handle leak repairs, attic moisture issues, and full roof replacements across the region. Our certified technicians find the real leak source and fix it.
Frequently Asked Questions
How do I dry out my attic after a leak?
First, stop the water source by repairing the roof leak. Then remove any standing water with a shop vacuum or towels. Set up air movers and a dehumidifier to circulate air and pull moisture from the space. If the attic insulation is saturated, remove and replace it rather than trying to dry it in place. Run the equipment for several days and check moisture levels with a meter before considering the job complete.
How much does it cost to vacuum out attic insulation?
The cost to vacuum out attic insulation depends on the square footage, insulation type, and accessibility. Sound Roof Care provides transparent pricing on its website so you can see what to expect before scheduling. Removing wet insulation promptly prevents mold growth and further damage to your home.
Can I remove wet attic insulation by myself?
You can remove wet insulation yourself if you have the right safety gear, including an N95 respirator, gloves, and protective clothing. However, it is labor-intensive and risky if the attic has structural damage or electrical hazards. For large areas or if you suspect mold, hiring a certified professional is safer. Sound Roof Care's technicians are trained to handle wet insulation removal and can assess hidden damage.
How can I prevent mold after attic insulation gets wet?
Preventing mold starts with fast action. Remove saturated insulation within 24 to 48 hours because mold can begin growing on wet surfaces in that window. Dry the attic thoroughly with fans and a dehumidifier, fix the roof leak, and improve attic ventilation to keep humidity low. If you see or smell mold, have a professional treat the area before installing new insulation.
A wet attic is a race against mold, rot, and damaged wiring. The faster you stop the leak and dry the space, the more insulation you save. Sound Roof Care is a family-owned team serving homeowners since 2009, with honest pricing and certified technicians who specialize in this wet, moss-prone climate. We handle leak repairs, attic moisture problems, and full roof replacements. Get in touch today and protect your home before the next storm.